Diatonic versus Chromatic
Most of the music we play on the dulcimer, called western music (coming from Western Europe), is based on an 8-note, or diatonic scale, which you probably know as DO-RE-MI-FA-SO-LA-TI-DO. But there are 5 other notes among those 8, usually referred to as accidentals. On a piano, the key of C starts at one C, and follows all the white keys up to the next C, with the black keys being the accidentals. This grouping of all 12 tones (13, including the high C) is called a chromatic scale.Most modern musical instruments are chromatic, in that they have all the accidentals within each diatonic scale. The piano is the most familiar, and also the easiest example to look at, in that it has a series of overlapping scales among the keys. If you were to think of each scale as a box, they'd look something like this.
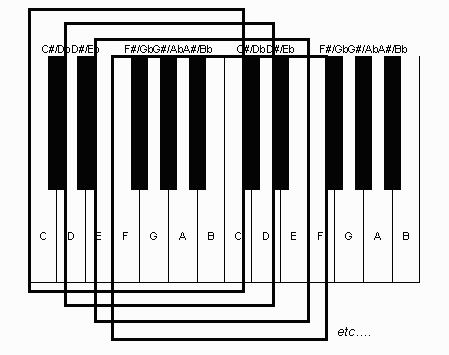
The hammered dulcimer, by contrast, is a diatonic instrument, where each scale is laid out without the accidentals, and they're laid out spacially besides. If you also think of these scales as boxes, you'll see that there's a lot less overlap:
The Dulcimer's Basic Major Scale
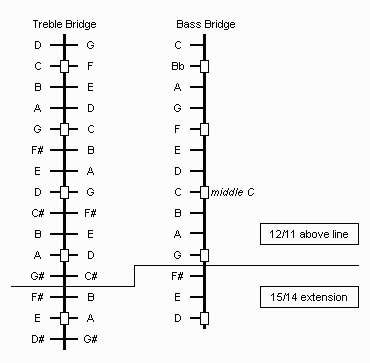
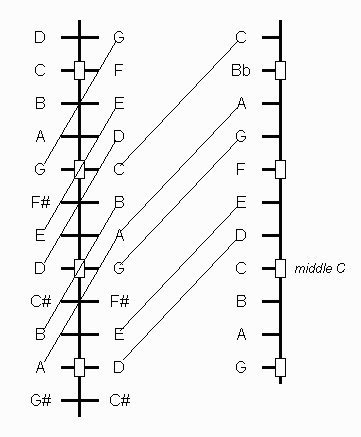
Let's look at a little piece of the dulcimer:
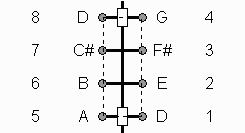
If You Have a Sharp Eye...
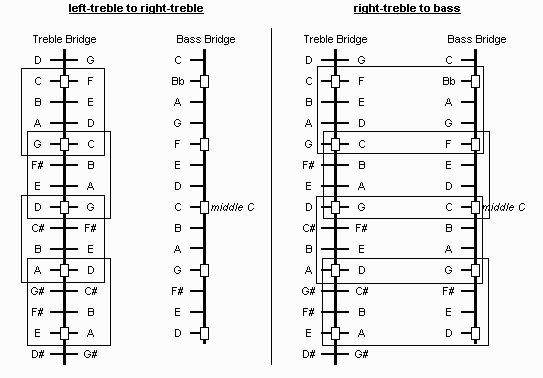
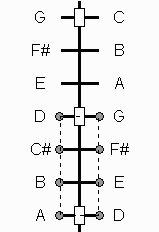
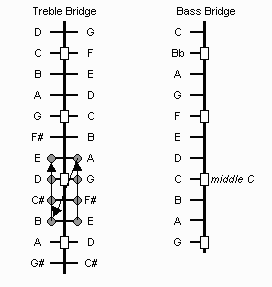
...you noticed something interesting. Let's look at a larger section of the treble bridge:
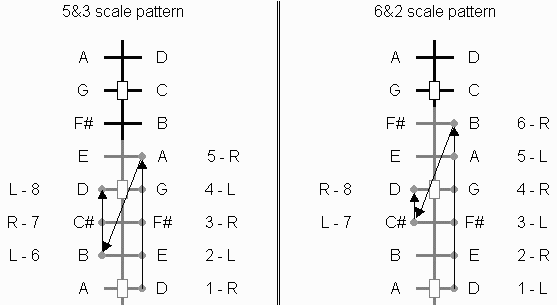
The answer is that the A needs to be there for the G major scale's 4&4 box pattern. But it also works within the D major scale, giving you an alternative to the A from the D major 4&4 box pattern. So now you have a second way to play the D major scale, as 5&3, starting this time with the right hammer.
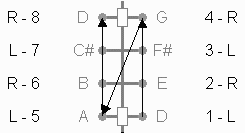
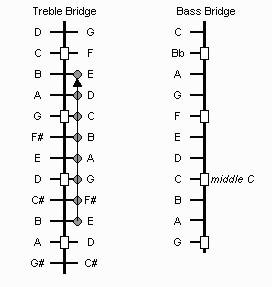
And by now, you've surely also noticed the B (sixth note of the scale) just above the A on right-treble. Once again, this note is needed for the G major scale, but it also gives you yet a third way to play the D major scale, this time as 6&2, starting with the left hammer. These two patterns look like this:
Not so fast. The note just below that upper D (at the bridge marker) is C natural, which is needed for the G major scale. In a D major scale, you need a C# there, so this pattern won't work.
So what does all this mean to you? First of all, it lets you play a major scale in all of the dulcimer's main keys -- D, G, C, F, and A on a 15/14 or larger instrument -- simply by moving these patterns to different bridge markers. And it works across the bridge valley the same way it works across the treble bridge.
Second, not every tune will fit neatly within the standard 4&4 box. Some are better suited to 5&3 or 6&2 (and sometimes even change during the tune) and many extend beyond a single octave.
In addition, you may find that you lead better with one hand than the other. That is, one hand may predominantly fall on the beat of the tune, and if you lead with your right hand, the 5&3 will work best for you.
One-Octave Excercise
Find every major scale available on your dulcimer that fits in a box, from the bottom up. On a 12/11 dulcimer, this will include G major, D major, C major, and, to a lesser extent, F major. 15/14 and larger dulcimers will also have one full octave of A major, starting at the bottom of the treble bridge.Start with the 4&4, and play the scale up and down, over and over again, until you can play it smoothly and cleanly. The pattern will be:
1-2-3-4-5-6-7-8-7-6-5-4-3-2-1-2-3-4-5-6-7-8-7-6-5-4-3-2-1, etc.
Play each scale all three ways (you'll only be able to play F major as 4&4 and 5&3). Start very slowly, and play smoothly and cleanly. Do not speed up until you can maintain a smooth and clear tone.
Two-Octave Exercise
This is just what it sounds like - the One-Octave Exercise extended to two octaves, as follows:
1-2-3-4-5-6-7-8-2-3-4-5-6-7-8-7-6-5-4-3-2-8-7-6-5-4-3-2-1
|-------second octave-------|
Start with your left hand. Note that the "8" of the first octave is the "1" of the second octave; don't stop there, but keep going, and keep the alternating pattern the same. Along the way, you should find that the first octave is played 4&4, while the second is played 5&3. Play this exercise back and forth until it comes easily.
Applying This to a Tune
To demonstrate how these patterns work within a tune, let's use "Twinkle, Twinkle, Little Star," a tune that most folks know only too well. Here's the first part of the tune in written form (click on the notes to play the tune).


Although the tune was very simple this time, this the way most dulcimer players approach tunes -- commit them to memory and then find the notes on the dulcimer. If it seems like a daunting task right now, remember that you're just getting the lay of the land. It'll feel more comfortable after a while, and eventually, you'll know where the notes are practically without thinking.
Tune Exercises
Play "Twinkle" again, but this time in G major. Don't worry, it's easy! Just take the pattern you learned for D major and move it up one bridge marker to the next box. The pattern will be exactly the same, but you'll be playing in a different key.Next, see if you can play it in C major, where the box starts on the bass bridge and crosses the bridge valley to right-treble. Again, the pattern is exactly the same. The only adjustment you have to make is for the slight offset because of strings passing each other.
Then see if you can find another tune on the dulcimer. Pick something simple that you know really well, perhaps another children's tune. Try to keep a steady alternation of L-R hammering. If something feels weird or uncomfortable, see if there's another way to approach it. Above all, be patient, and don't beat yourself up for mistakes.
Addendum
Finding Duplicates on the Fly
On any dulcimer, a duplicate note can always be found to the right (across the treble bridge or treble-bass valley) and up four strings. From any given note, move right-1 and up-4, and you'll always find a duplicate, unless the second note is on a bridge marker.
Minor Keys
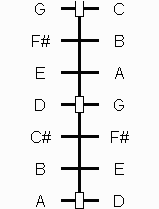
Minor keys don't present too many problems on the dulcimer, at least in traditional tunes, but you need to remember that a minor scale never starts on a bridge marker unless you're jumping around the strings.It's also important to know that there are two to three different modes generally referred to as "minor." Happily, a lot of the traditional tunes we play on the hammered dulcimer (both American and Celtic) use what's called the Dorian mode, which falls as easily on the dulcimer as the major mode, in a simple 4&4 box pattern. On the treble bridge of your dulcimer, E Dorian looks like this:
Melodic Minor runs a straight line up one side of the bridge. This can feel weird when you're used to moving sideways, but the workarounds are fairly easy. Here's E minor on the dulcimer:
Here again, you can find the keys of A minor (on bass) and B minor (left-treble). A minor on right-treble and D minor on bass are a bit limiting because you run out of dulcimer before you get to the top of the scale and have to move to the left. You can also play these minor scales using the 6&2 pattern.